Setting the Stage: From Orchestration to Iteration
This is the fourth post in our ongoing series on building an AI-augmented pharmacometric workflow. Each post builds on the last, bringing us closer to our final goal of a fully autonomous PopPK analysis agent.
To get you up to speed, here's where we've been so far:
- Part 1: The Vision: We established the 'why' for AI in pharmacometrics, focusing on building secure, auditable, and human-in-the-loop systems.
- Part 2: The Foundation: We built the core single-agent framework capable of generating a basic R script from a prompt.
- Part 3: The Orchestration: We introduced a multi-agent architecture using DSPy, allowing for the delegation of tasks between specialized AI agents.
In our last post, we designed a system where agents could collaborate. However, that approach introduced a new challenge: how do we equip our "Coder" agent to handle complex, multi-step tasks where failure during the first pass is expected and iteration is required? A single-shot attempt at writing NONMEM or nlmixr2 analysis script is extremely unlikely to accomplish the task.
Today, we'll build a self-correcting engine: a Read-Eval-Print-Loop (REPL) that allows our agent to write code, test it, analyze the errors, and try again until it succeeds.
Who is this for? (And what you'll need)
This post is for technical practitioners—pharmacometricians, AI engineers, and data scientists—interested in the practical application of AI in regulated GxP environments. All code for this post is available in our PharmAI GitHub repository.
Before we dive into building our REPL, let's establish why this specific challenge matters so much for our broader pharmacometric AI vision.
The Core Challenge: Building the Foundation That Everything Else Depends On
You might be wondering: "Why are we building a REPL instead of diving straight into PopPK modeling?" The answer is simple: without a robust REPL, everything else falls apart.
The reality of scientific programming is brutal. We write code, it breaks, we debug it, and we run it again. Sometimes five times. Sometimes fifteen. For an AI agent to be a useful assistant rather than a frustrating toy, it must replicate this workflow. The REPL forms the foundational engine that makes everything else possible.
Think about what our final system needs to do:
- Generate complex
nlmixr2models with proper syntax - Create simulation scripts using
mrgsolvefor synthetic data - Build visualization code that actually runs
- Integrate multiple R packages with correct dependencies
- Handle edge cases in real pharmacometric datasets
Every single one of these tasks requires iterative debugging. Consider what happens when you ask an AI to generate an nlmixr2 model. The first pass might have a syntax error in the model block. The second might forget to initialize a parameter. The third might fail because the input dataset has an unexpected column name. A robust REPL handles all of these sequential, context-dependent failures automatically.
# First attempt - looks reasonable
library(mrgsolve)
mod <- mread("pk_model")
sim_data <- mod %>% ev(amt=100) %>% mrgsim()
Loads mrgsolve, attempts to read a model file, and simulates a 100mg dose using pipe operators.
But then you run it and get:
Error in mread("pk_model"): model file not foundThe script crashes because "pk_model" doesn't exist in the working directory.
A traditional text-to-code generator stops here. You're left copying error messages back into a new prompt, hoping the AI remembers the context. This manual iteration is exactly what we need to automate, both for convenience and because our entire pharmacometric workflow depends on it.
We need a system that can:
- Generate a piece of code to accomplish a task
- Execute that code in a safe, sandboxed environment (eventually)
- Evaluate the outcome (stdout, stderr, exit codes)
- Loop, using the evaluation results as context for the next attempt
This cyclical process is the essence of a REPL, transforming an AI from a code snippet generator into a persistent problem-solver capable of handling the complexity of real pharmacometric work.
Step 1: Defining the Agent's Tools with DSPy Signatures
Rather than building a complex class hierarchy (which we tried first—more on that later), we designed two clean DSPy signatures that handle the thinking parts of our loop.
The CodeGenerator signature takes the task, programming language, and crucially, the context of previous attempts:
class CodeGenerator(dspy.Signature):
    """Generate code to achieve a specific task."""
    task: str = dspy.InputField(desc="What we want to achieve")
    language: str = dspy.InputField(desc="Programming language to use (e.g., Python, R)")
    context: str = dspy.InputField(desc="Previous attempts and feedback")
    # Output: generated code and reasoning
    reasoning: str = dspy.OutputField(desc="Step-by-step thinking about the approach")
    code: str = dspy.OutputField(desc="Complete script to execute")
DSPy signature with three inputs (task, language, context) and two outputs (reasoning, code). The context field accumulates failure history.
That context field is where the magic happens. On the first attempt, it's simply "First attempt." But on subsequent iterations, it becomes rich with failure details: "Attempt 2: The previous attempt failed with 'Error: object 'one.compartment.model' not found'. The model needs to be defined before use."
The TaskEvaluator signature determines if the executed code was successful by analyzing the outputs:
class TaskEvaluator(dspy.Signature):
    """Evaluate if executed code completed the task and provide summary."""
    task: str = dspy.InputField(desc="What we wanted to achieve")
    code: str = dspy.InputField(desc="The code that was executed")
    execution_result: str = dspy.InputField(desc="The result of code execution")
    # Output: analysis of execution result and completion status
    result_summary: str = dspy.OutputField(desc="Analyze the execution result. If task completed, explain what was accomplished and key results. If not completed, explain what still needs to be done and why.")
    task_completed: bool = dspy.OutputField(desc="Based on the above analysis, True if task was successfully completed")
Takes execution results and returns a boolean success flag plus a summary explaining why it succeeded or what went wrong.
This binary evaluation—task_completed: bool—proves crucial for closing the loop. The AI must make a clear decision: did this work or not?
Step 2: The Journey to a Simple, Robust REPL
Here's where I need to confess something: our first attempt was an over-engineered disaster.
We built an elaborate ExampleRepository class with intelligent scoring algorithms for retrieving relevant examples. We added complex JSON schemas and premature optimization helpers. It was clever, sophisticated, and completely unnecessary (I'd love to revisit this in later posts).
At some point I asked Claude Code (our AI coding assistant for all this): "revisit this entire code and check for overengineering."
This pivot moment taught us two critical software design principles:
- YAGNI (You Aren't Gonna Need It): We removed features that weren't immediately necessary for the core loop
- KISS (Keep It Simple, Stupid): We replaced complex classes with simple functions and basic keyword matching
The resulting code was dramatically simpler, more robust, and easier to maintain. Here's the core loop that emerged:
def repl_loop(task: str, language: str = "python", max_iterations: int = 5, existing_code: str = None) -> dict:
    """Main REPL loop that iteratively generates and executes code."""
    # Configure generators with higher token limits for complex scripts
    generator = dspy.ChainOfThought(CodeGenerator, max_tokens=8000)
    evaluator = dspy.ChainOfThought(TaskEvaluator, max_tokens=8000)

    # Generate script name from task
    script_name = generate_script_name(task)

    # Build initial context
    if existing_code:
        context = f"Starting with this working code as a base:\n\n```{language}\n{existing_code}\n```\n\nNow enhance/modify it to: {task}"
    else:
        context = "This is the first attempt."

    for iteration in range(1, max_iterations + 1):
        print(f"Attempt {iteration}...")

        # Generate code (LLM call #1)
        code_response = generator(
            task=task,
            language=language,
            context=context
        )

        # Execute code
        result = execute_code(code_response.code, language)
        execution_result = json.dumps(result, indent=2)

        # Evaluate completion (LLM call #2)
        eval_response = evaluator(
            task=task,
            code=code_response.code,
            execution_result=execution_result
        )

        if eval_response.task_completed:
            print("Success!")
            print(f"Summary: {eval_response.result_summary}")
            execute_code(code_response.code, language, save_only=True, script_name=script_name)

            return {
                "success": True,
                "iterations": iteration,
                "task": task,
                "language": language,
                "reasoning": code_response.reasoning,
                "code": code_response.code,
                "result": result,
                "result_summary": eval_response.result_summary
            }

        print(f"Not completed - {eval_response.result_summary}")
        context = f"Previous attempt failed. Code: {code_response.code}\nResult: {execution_result}\nWhat needs to be done: {eval_response.result_summary}"

    execute_code(code_response.code, language, save_only=True, script_name=script_name)

    return {
        "success": False,
        "iterations": max_iterations,
        "task": task,
        "language": language,
        "reasoning": code_response.reasoning,
        "code": code_response.code,
        "result": result,
        "result_summary": eval_response.result_summary
    }
Core orchestration: initializes DSPy modules → loops up to 5 times → each iteration calls generator → executes code → evaluates result → either returns success or enriches context with failure details for next attempt.
(Note: All REPL sessions are automatically tracked via MLflow integration - see the MLflow section for implementation details.)
The beauty of this approach lies in its simplicity. Each iteration enriches the context, giving the AI increasingly specific information about what went wrong and what needs to be fixed.
Step 3: Safe Code Execution - The Critical Foundation
The execute_code function is where the rubber meets the road. This goes beyond simply running code; we need to do it safely in a production environment:
def execute_code(code: str, language: str = "python", save_only: bool = False, script_name: str = None) -> dict:
    """Execute code and return results."""
    script_path = None

    try:
        cleaned_code = clean_code(code)
        suffix = ".py" if language.lower() == "python" else ".R"

        # Ensure temp_workdir exists
        temp_workdir = "temp_workdir"
        os.makedirs(temp_workdir, exist_ok=True)

        if save_only:
            save_path = os.path.join(temp_workdir, f"{script_name or 'saved_script'}{suffix}")
            with open(save_path, 'w', encoding='utf-8') as f:
                f.write(cleaned_code)
            print(f"Script saved to: {save_path}")
            return {"success": True, "stdout": "", "stderr": "", "returncode": 0}

        # Normal execution path
        with tempfile.NamedTemporaryFile(mode='w', suffix=suffix, delete=False, encoding='utf-8') as f:
            f.write(cleaned_code)
            script_path = f.name

        cmd = [sys.executable, script_path] if language.lower() == "python" else ["Rscript", script_path]

        result = subprocess.run(cmd, capture_output=True)

        return {
            "success": result.returncode == 0,
            "stdout": result.stdout.decode('utf-8') if result.stdout else "",
            "stderr": result.stderr.decode('utf-8') if result.stderr else "",
            "returncode": result.returncode
        }

    except Exception as e:
        return {
            "success": False,
            "stdout": "",
            "stderr": f"Execution error: {str(e)}",
            "returncode": -1
        }
    finally:
        # Clean up temp file
        if script_path and os.path.exists(script_path):
            try:
                os.unlink(script_path)
            except:
                pass
Writes code to temp file → runs via subprocess (Python or R) → captures stdout/stderr → returns structured dict with success flag and outputs → cleans up temp files in finally block.
This execution environment handles timeouts, captures all output streams, and ensures cleanup. These features prove critical for a system that might generate and run hundreds of scripts during development. We haven't yet implemented a sandbox, but this provides the framework where a docker image or ssh connection can replace the subprocess call and allow us to control exactly where the code runs.
This entire cyclical process can be visualized as follows. Let's walk through the architecture.
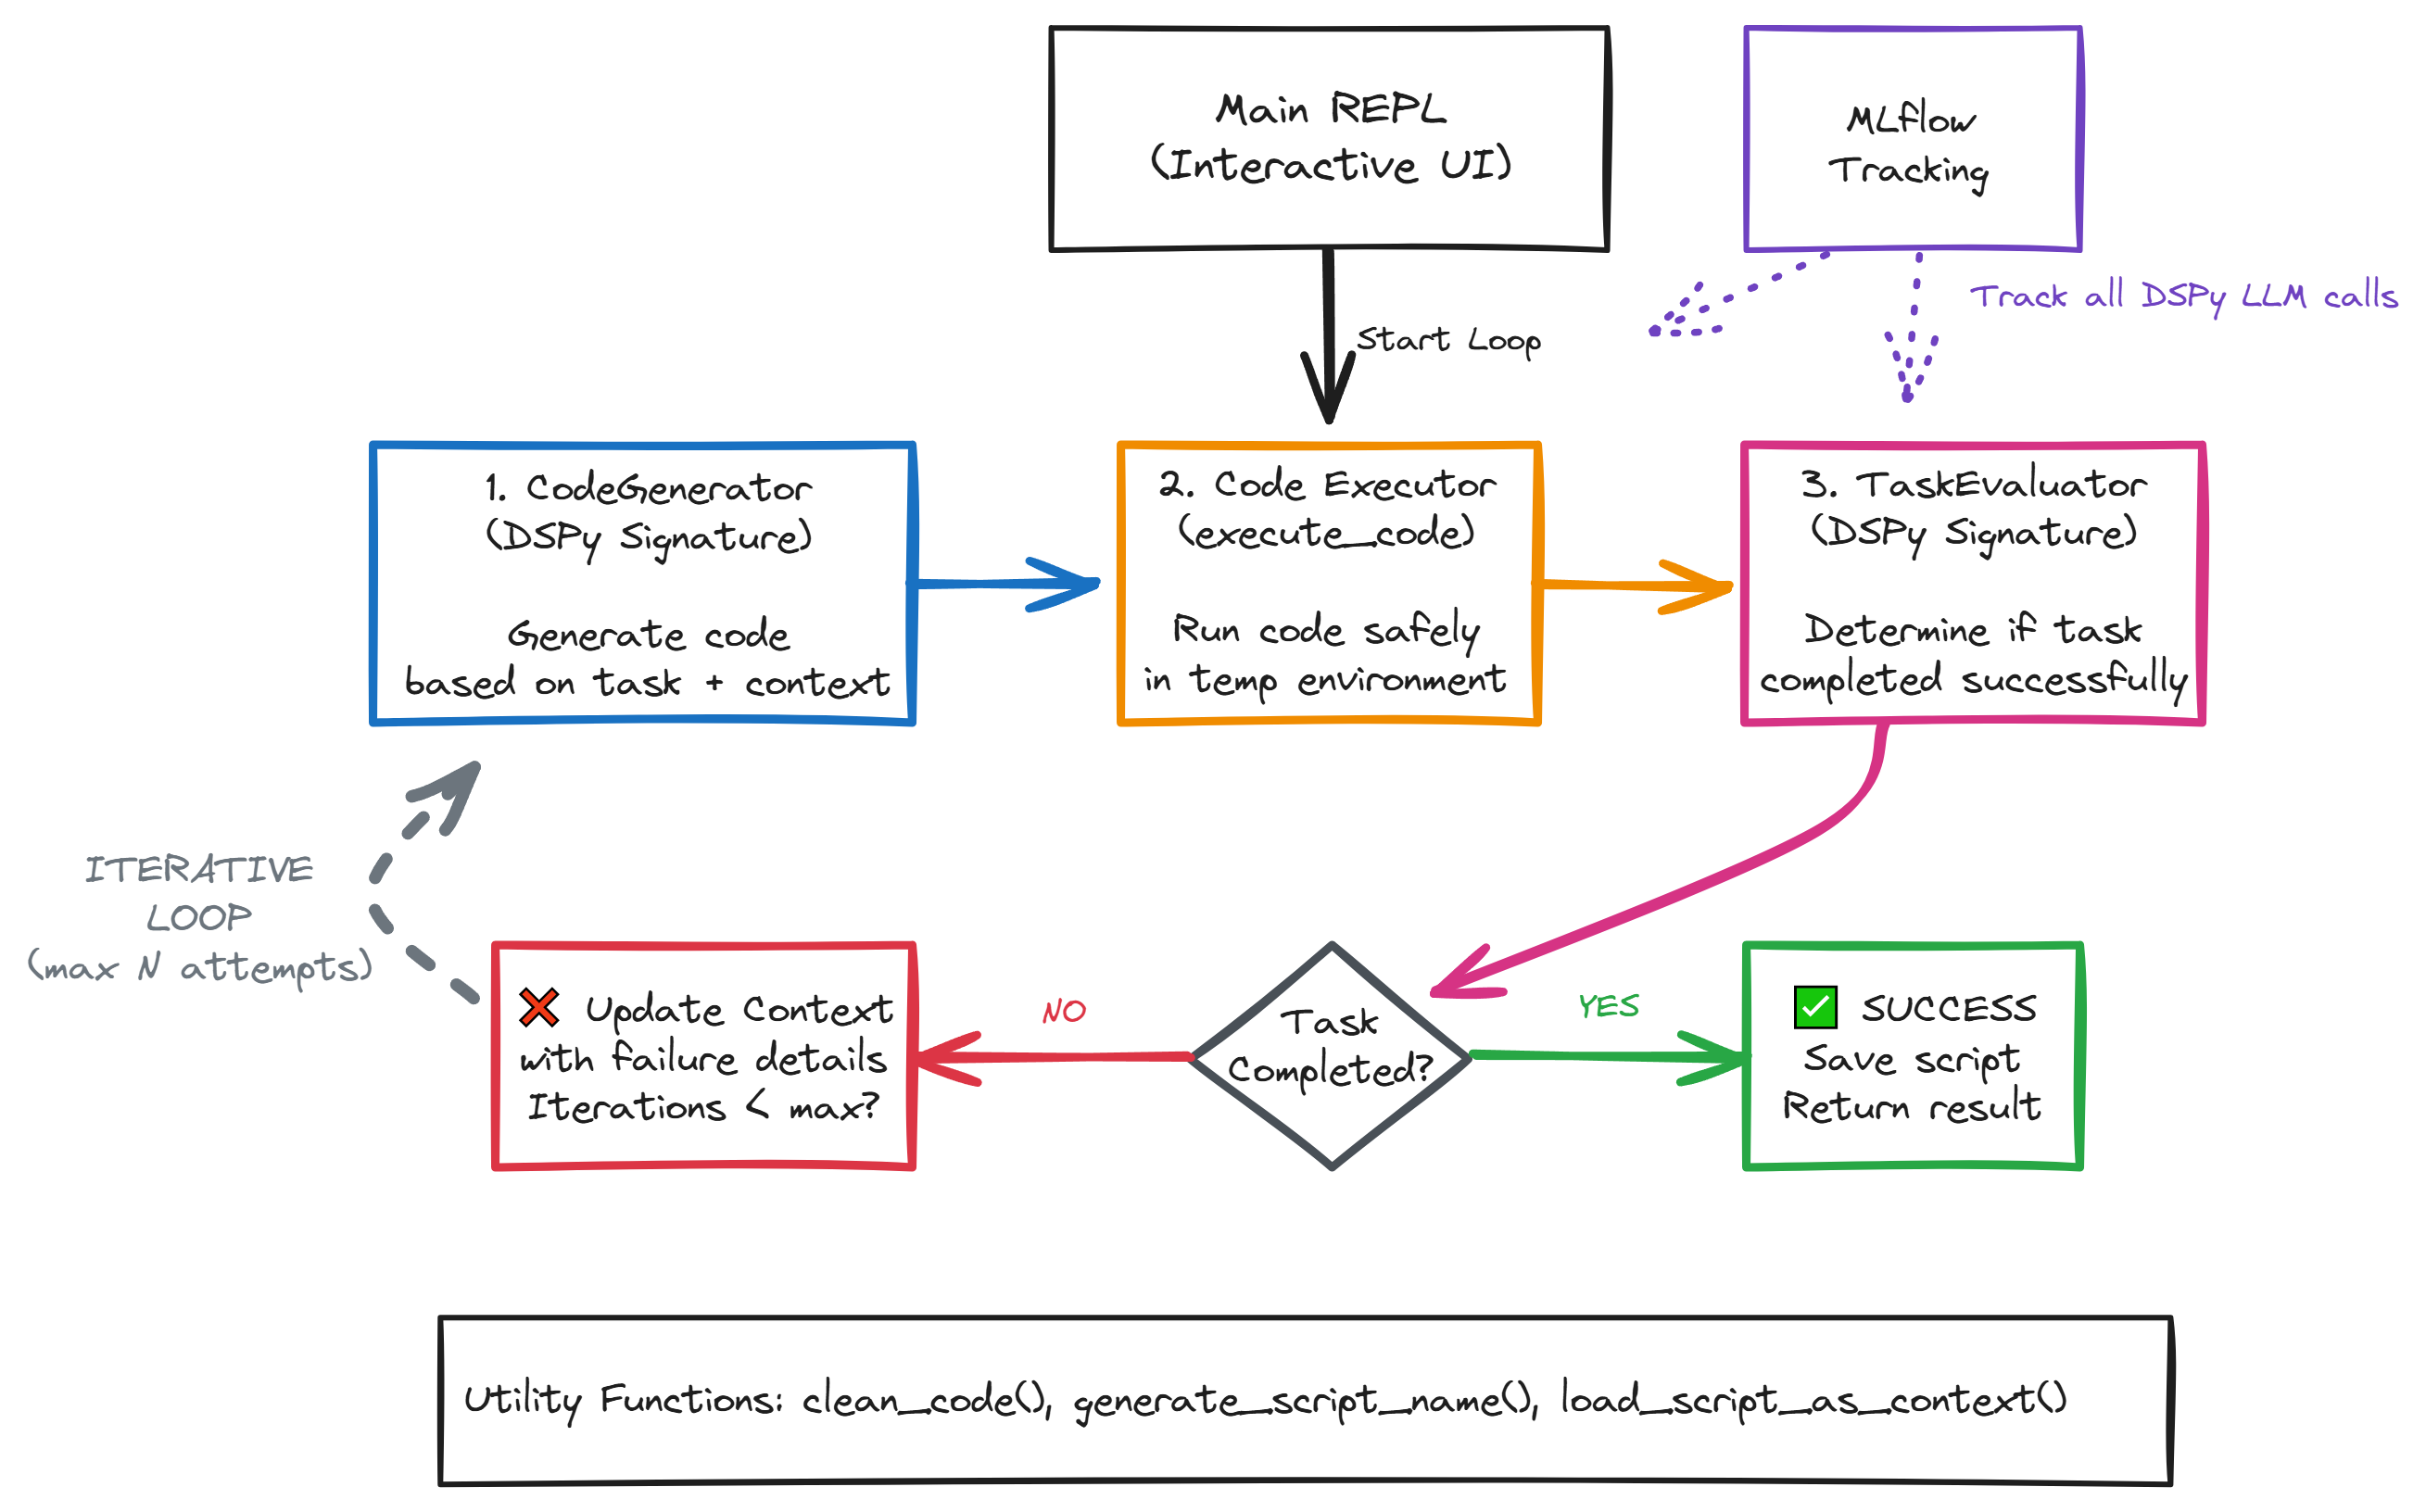 Architecture of the Self-Correcting REPL System. The diagram illustrates the iterative code generation and evaluation loop at the heart of our pharmacometric AI assistant. The process begins with the Main REPL interface, which initiates the loop sequence. Three core components work in concert: (1) the CodeGenerator DSPy signature generates code based on the task description and accumulated context from previous attempts, (2) the Code Executor safely runs the generated code in a temporary environment using subprocess calls, and (3) the TaskEvaluator DSPy signature analyzes the execution results to determine if the task was successfully completed.
If the task fails, the system updates the context with specific failure details and loops back for another attempt (up to N iterations). This iterative refinement allows the AI to learn from its mistakes and progressively debug issues. Upon success, the final script is saved and results are returned. Throughout this process, MLflow tracking (shown in purple) captures all DSPy LLM calls, providing visibility into the learning process. Supporting utility functions handle code cleaning, script naming, and context management. This architecture transforms a simple text-to-code generator into a resilient problem-solver capable of handling the complex, iterative nature of scientific programming workflows.
Architecture of the Self-Correcting REPL System. The diagram illustrates the iterative code generation and evaluation loop at the heart of our pharmacometric AI assistant. The process begins with the Main REPL interface, which initiates the loop sequence. Three core components work in concert: (1) the CodeGenerator DSPy signature generates code based on the task description and accumulated context from previous attempts, (2) the Code Executor safely runs the generated code in a temporary environment using subprocess calls, and (3) the TaskEvaluator DSPy signature analyzes the execution results to determine if the task was successfully completed.
If the task fails, the system updates the context with specific failure details and loops back for another attempt (up to N iterations). This iterative refinement allows the AI to learn from its mistakes and progressively debug issues. Upon success, the final script is saved and results are returned. Throughout this process, MLflow tracking (shown in purple) captures all DSPy LLM calls, providing visibility into the learning process. Supporting utility functions handle code cleaning, script naming, and context management. This architecture transforms a simple text-to-code generator into a resilient problem-solver capable of handling the complex, iterative nature of scientific programming workflows.
Real-World Example: Generating Clinical Trial Simulation Data
Let me show you how this plays out in practice. To demonstrate the REPL's power, we need a task where the solution is iterative and visual - perfect for highlighting the self-correction mechanism. While our ultimate goal is complex clinical trial simulation (a topic so rich it deserves its own future post) we can perfectly illustrate the self-correction mechanism with a classic computer science challenge: Conway's Game of Life. This allows us to focus purely on the REPL's logic without getting bogged down in domain-specific data.
Here's an actual session where we asked the REPL to "create a simplified version of Conway's Game of Life":
Attempt 1: The AI generates a script but it's sort of boring:
Generation 1:
□□□■□□□□□□□□□□□
□■■■□□□□□□□■□□□
□□□□□□□□□□■■□■□
■■□□■□□□□□□□■□□
□□□□■■■□□□□□□□□
□□□■□□□□□□□□□■□
■■■□■□□■□□□□□■□
■□□□■■■■■■□■■□■
■□□□□■□■■■■□■■□
□□□□■■■□□□□□□□■
□■□□□■□□□□□□□□■
□□■□□□■□□□□□■■■
□□■□■□■□□■□□□□□
□■■□■□■■■■□□□□□
□□□■■□■■□□□□□□□
ASCII grid where ■ = live cell, □ = dead cell. Each generation applies Conway's rules: cells with 2-3 neighbors survive, dead cells with exactly 3 neighbors become alive.
We then ask it to add color, and in our final iteration request "use a game engine so that this renders well". This final version is still pretty simple but I actually really enjoy playing around with it. You can run the python script yourself here.
The iterative debugging process reveals something crucial: the REPL goes beyond fixing syntax errors to handle conceptual mistakes (or in this case updates from the user).
The Lessons: YAGNI and KISS in Practice
This project became a masterclass in practical software design. Our initial over-engineered solution taught us that:
- YAGNI is liberating: Every feature you don't build is code you don't have to maintain, test, or debug
- KISS compounds: Simple solutions are easier to extend, modify, and reason about
- Iteration beats perfection: A working simple system you can improve is better than a complex system that doesn't work
The final REPL is under 300 lines of code but handles complex scenarios robustly. You can explain it to a colleague in 10 minutes, which is a far cry from our original complex architecture.
Further Reading & Resources
- DSPy Documentation: The official guide to building structured LLM applications
- Read-Eval-Print-Loop (REPL): Background on the computer science concept
- MLflow Documentation: Experiment tracking and model management
MLflow Integration for Session Tracking
Every REPL session is automatically tracked using MLflow, giving us detailed visibility into all of our LLM calls:
# MLflow configuration in dspy_repl.py
mlflow.dspy.autolog(
    log_compiles=True,              # Track optimization process
    log_evals=True,                 # Track evaluation results
    log_traces_from_compile=True    # Track program traces during optimization
)

mlflow.set_tracking_uri("file:./mlruns")
mlflow.set_experiment("DSPy-REPL")
Enables automatic logging of all DSPy operations. Each REPL session creates a new MLflow run with nested child runs for each iteration.
This tracking captures:
- Code Generation Attempts: Each LLM call with full context
- Execution Results: Success/failure rates and error patterns
- Iteration Patterns: How many attempts different types of problems require
- Performance Metrics: Which prompting strategies work best
After running sessions, you can launch mlflow ui to explore the data. We've used this often to debug where in our loops the model might be hitting a snag. Eventually we can use this to more programmatically improve our system.
Wrapping Up: What We Accomplished and Where We're Going
Let's recap what we built today. We successfully created a robust, self-correcting code generation loop using DSPy that transforms our AI from a simple generator into a resilient problem-solver capable of iterative debugging.
Key Takeaways from This Post:
- Core Concept Introduced: The Read-Eval-Print-Loop (REPL) as a method for iterative AI-driven development that mirrors human debugging workflows
- Practical Implementation: We used two DSPy signatures (
CodeGenerator,TaskEvaluator) and a secure execution function (execute_code) to create a self-correcting cycle that automatically improves with each failure - Design Philosophy: We learned that embracing YAGNI and KISS principles leads to more robust, maintainable systems than complex over-engineered solutions
- Production Features: Session persistence, MLflow tracking, and safe code execution make this suitable for real pharmacometric workflows
The work we've done here provides the perfect foundation for our next challenge. Now that we have a system that can reliably determine success or failure while generating high-quality task-oriented code, we're ready to systematically evaluate and improve its performance.
In the next post, we'll put everything together in a complete end-to-end walkthrough using synthetic pharmacometric data - from data generation through PopPK modeling with our full agent system. Stay tuned!
What's the biggest challenge you face when trying to automate scientific programming workflows in your organization? Share your thoughts in the comments or reach out on LinkedIn.
This post was developed with assistance from AI. Views expressed are my own and do not represent my employer.